DRILL BOOK
Advanced Groundies #1
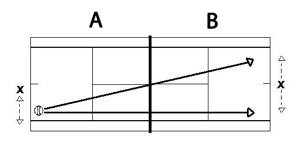
Player A - The goal here is to hit the same stroke over and over, generating the same movement (roughly) in order to develop muscle memory while changing the direction of the ball each shot from line to cross court. Movement should be to turn and run to the ball then shuffle back to 3-4 feet short of center mark with a split-step (if necessary, crossover or running steps are okay for recovery).
Player B - The goal here is to move side to side and hit different strokes to the same spot, learning how to hit back behind your opponent. A “turn & run to, shuffle away” mentality should be adopted here, using the center mark as a guide for when to turn and run. However, if necessary crossover or running steps are okay.
Overall Goal – To reinforce good movement while understanding the timing on the ball for line vs. cross court. When hitting the line, point of contact will be back further, or later, so the racket can hit the back of the ball, and for cross court, point of contact should be further out in front, or earlier, so the racket can hit the side of the ball. Be sure to get both your shoulders & hips around (turned) on the ball by moving your feet to position (especially for closed stance players). Drill can be done to both sides (FH & BH).
Tip – Start each rally at 80% pace for the first 4-5 shots & build pace from there. As you get more comfortable start to increase pace gradually. Greater depth allows for longer rallies while sharper angles help develop a better understanding of point construction.
Advanced Groundies #2
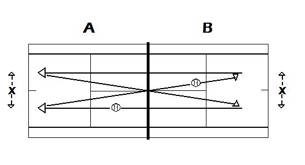
Player A – Hits everything cross court while moving side to side, running to ball and shuffling away, using center mark as a guide to turn and run.
Player B – Hits everything line while moving side to side, running to ball and shuffling away, using center mark as a guide for when to turn and run.
Overall Goal – To reinforce good movement while changing the direction of the ball on each shot, but hitting the same direction off each side.
Tip – Since you know where the ball is going, if you’re having trouble keeping up, forget shuffling away at first and just turn and run from shot to shot. Aiming 5-7 feet to each side of center line not only allows the rallies to last longer, but also gives you a bigger margin for error to the side lines.
Advanced Groundies #3
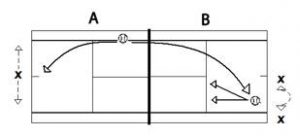
Player A – Is trying to hit a heavy (lots of topspin,) deep, loopy ball that forces a high backhand (a weak shot for most people) that forces either an error or a short ball back.
Player B – Is trying to run around and get in position to hit a forehand on the rise (anywhere is fine, depending on Player A’s position). If hitting a forehand is not an option or would give up too much position then move forward and hit a backhand on the rise.
Tip – Try not to back pedal on the ball and make sure you split 3-4ft. short of center mark on your recovery. First step is hugely important; the bigger & faster your first step is in getting around the ball, the more time you’ll create for yourself to play the shot.
Advanced Volleys #1
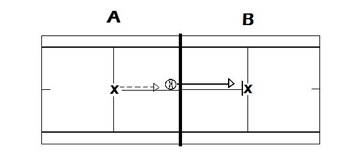
Player A – Starts at service line to receive feed from player B. After hitting 1st volley player A advances forward & splits before hitting 2nd volley. Repeat after each shot until proper net position is achieved.
Player B – Starts and stays on service line as player A moves forward/attacks.
Overall Goal – Player A wants to hit down to the feet of player B, forcing them to hit up on the ball so that A can continue to move forward and attack. Player B is trying to keep the ball low and force a pop up/short ball so they can turn defense into offense.
Tip – Make sure you keep your hands up & out w/ your wrist position back & ready. Make split steps between shots EVRERY TIME! Try not to crowd the net too much as you move forward and watch the ball off your opponents racket. Drill should be done on a ½ court (center line to singles sideline) so that you have to hit through, not around, your opponent.
Advanced Volleys #2

Overall Goal – Both players want to keep the ball moving in the air (volley/volley) cross court. This should produce a lot of 2 types of balls:
- Balls angling away from you
- Balls coming directly at you (on your center line)
Either way your focus should be to step towards the net posts, either to cover space (stepping across your body and forward towards the net post) or to create space (stepping diagonally forward towards the other net post w/ the appropriate foot & sliding the back toe). Both moves should allow you to make a nice shoulder turn and position the racket out front for contact as your step cuts off the angle to the ball and moves you forward.
Intermediate Groundies #1
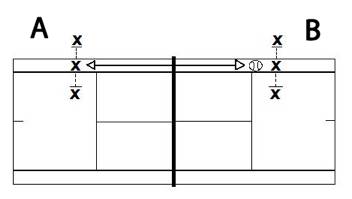
Overall Goal – Both players should position themselves in the middle of the alley at the mini-tennis depth (1-2ft. behind the service line). The goal is to keep the ball in the alley while each player moves into proper position to hit by turning the shoulders & hips and moving to the side (outside the alley) before transferring weight back forward into the shot. After hitting, shuffle back to mid-alley & split-step. Move back further as your success increases.
Tip – Make sure you are moving side fence to side fence to create space rather than remaining in the alley and back pedaling. Use the width of the alley as your guide for how far to move, if the ball is in the middle of the alley, your feet should be on or outside the alley sidelines.
Intermediate Groundies #2
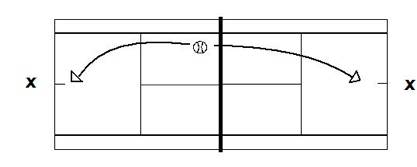
Set Up – Tie a rope across the court about 2 – 2 ½ ft. above the net. (If you don’t have a rope, just imagine it’s there and eyeball it.)
Overall Goal – Both players are trying to rally while hitting the ball above the rope. The focus should be on hitting heavier topspin to allow the players to hit out on the ball while still clearing the rope and not hitting long. Try not to clear the rope by 2 or 3 ft (that’s why the rope is that high above the net,) but rather try and hit near the level of the rope so you’re clearing the net by 2-3ft.
Tip – Don’t focus on trying to clear the rope so much as just hit the ball and use the rope as your guide for how much to adjust. Remember, as the ball clears the net by more it tends to land deeper, giving you less time to play your shot so prep quickly and stay down through contact as the ball starts bouncing closer to the baseline.
Intermediate Volleys #1
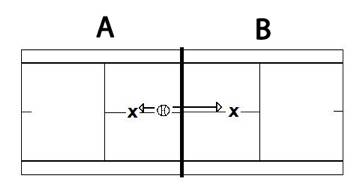
Player A – Starts approx. 3-4ft. inside service line ready to receive feed from player B with hands up & out and wrist position back & ready. After hitting volley back to player B return to ready position and split-step.
Player B – Starts approx. 3-4ft. inside service line and feeds ball to player A. After feed return to ready position w/ hands up & out and wrist position back & ready and split-step.
Overall Goal – To keep the ball moving in the air (no bounce) back and fourth as many times as possible. Remember to move w/ fast feet to the ball and get back to ready and split-step between EVERY SHOT!
Tip - Try and turn shoulders to play the ball while prepping the racket out front (no back swing). Be careful not to let the racket get behind your shoulder on your turn to prep. Let the hands block and the legs drive!
Intermediate Volleys #2
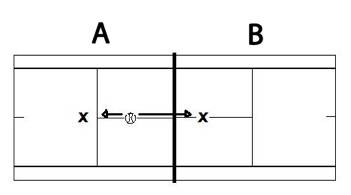
Player A – Starts at the mini-tennis depth and hits normal mini-tennis pace making sure to split step between shots.
Player B – Starts at the net in volley position and tries to volley back to the mini-tennis player, bouncing the ball to player A, making sure to split step between shots.
Overall Goal – To keep the ball going while A hits mini-tennis groundies and B hits volleys. Control is the key in this drill with quick prep & split steps.
Tip – This drill is easier on both sides if the players are splitting between shots and using fast feet to & away from the ball. For the net player, getting the racket out in front on prep and setting the front foot early (before contact) when possible creates good balance and allows the hands (racket) to control and soften the pace of the volley when necessary. In order to take extra pace off the ball, soften your grip on the handle at contact (don’t squeeze the racket so hard).
Doubles Sim
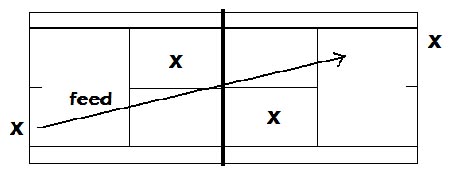
Set Up-Start the drill like a normal doubles set up. Feed from the baseline cross court to the other baseline player. All four play the point out. Repeat in the same formation for 5 points in a row and then reverse (to the ad-side) and feed 5 more.Games to to whatever score you like, but first to 15pts. is standard.
Objective-To reinforce good doubles positioning and movement. Encourage the baseliners to move forward and net players to poach. If there are more than 4 players have extras wait at the baseline fence and rotate in on errors.
Tip-Keep the drill moving! The point is to be able to play a lot of points w/o breaks and get repetition. The more points you play the more the positioning and angles become second nature. If necessary, give 2 chances per player on the feed to start a rally.
Hot Seat
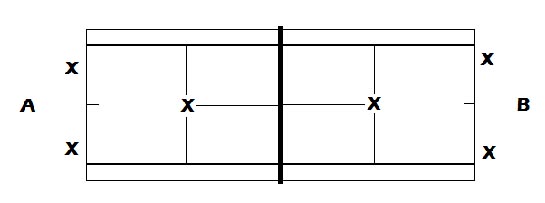
Set Up-This game is 3 vs. 3 with the “Hot Seat” starting at the T. The feed comes from Side A to Side B and both net players move “forward & follow” upon the feed (follow the ball). Once the point is finished all players reset and do it all again. If there are more than 6 players they should rotate in on errors, always coming in on the deuce side baseline position w/ the other players rotating clockwise (as you face the net) into the vacant spot. Volley winners are worth 2pts., all else is worth 1pt.
Objective-The net players should be aggressive as they have the alleys in play for this drill. “Forward & Follow” should be the mantra at the net and the baseliners should forget about one another and play the game as if it’s just them and the net player (like doubles) so positioning is consistent. Only the baseliners may hit the feed, then all six players are live.
Tip-Net players should not look back as the ball passes them. Keep eyes forward and discern what is happening behind you from what you see happening in front of you. Get to position and split step before the ball is hit when possible.
5 Ball Drill
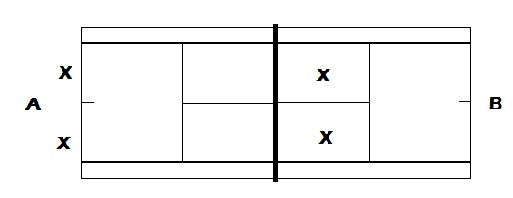
Set Up-Two at the net and two at the baseline. Extras for side A wait at the baseline fence and extras for side B wait at the net posts. Side A feeds a series of 5 balls to side B, the first of which should be a lob. After the first ball the next four should be fed to test side B’s movement and court coverage or for less experienced players, to teach them court coverage. To score a point, a team must win 3 of the 5 balls fed. If they win 4 of 5 they get two points and if they get all 5 of 5 balls fed, the team would get three points. Teams rotate after each 5 ball series. Games are played to 10.
Objective-To make side B move as much as possible while covering the court together. Make sure the players move together and communicate. The person feeding should keep the drill as difficult as the skill level of the group can handle once everyone is comfortable with the drill. Don’t hesitate to feed more than one lob per 5 ball series. Side A should try to play w/ a counterpunching mentality, keeping the ball low and away from the net players, forcing them to hit up so that side A can move forward, turning defense to offense.
Thanks for subscribing! Please check your email for further instructions.